


Can CalenGoo sync with Outlook or Exchange?
CalenGoo for Android can sync directly with Exchange (EWS) or it can be synced via the Android calendar.Syncing CalenGoo directly with Exchange
You can just enter your Exchange account under "Settings > Accounts > Add account > Exchange" in CalenGoo to sync CalenGoo with your Exchange calendars. To sync tasks just add the same account under "Settings > Tasks > Add account > Exchange". The advantage of syncing directly is that CalenGoo can sync all your past and future events and also your Outlook categories this way:
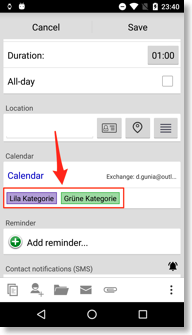
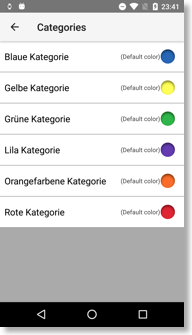
You can also change the colors of these categories: Just open "Settings > Accounts", tap your Exchange account and select "Categories".
To sync with Exchange CalenGoo uses "EWS", which Microsoft recommends for clients that want to access all attributes of the events and tasks.
You can also change the colors of these categories: Just open "Settings > Accounts", tap your Exchange account and select "Categories".
To sync with Exchange CalenGoo uses "EWS", which Microsoft recommends for clients that want to access all attributes of the events and tasks.
Syncing the Android calendar with Exchange
You can sync CalenGoo via the Android calendar with Exchange: Just turn "Settings > Accounts > Android" on in CalenGoo (it is already turned on by default) and add your Exchange account in the "Accounts" section of your phone’s "Settings" app.
Another option is to install a 3rd party app that can sync the Android calendar with Exchange like "AquaMail" or "Nine". It can do the same as the built-in functions mentioned above, i.e. it can sync the Android calendar with Exchange so that CalenGoo can be used with your Exchange account.
Another option is to install a 3rd party app that can sync the Android calendar with Exchange like "AquaMail" or "Nine". It can do the same as the built-in functions mentioned above, i.e. it can sync the Android calendar with Exchange so that CalenGoo can be used with your Exchange account.
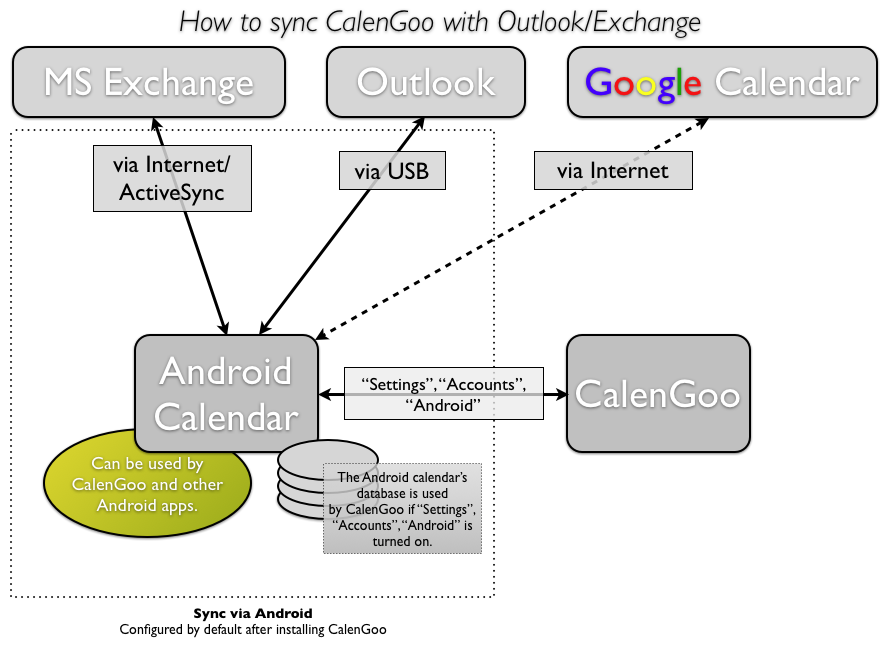
Syncing the Android calendar with Outlook
If your device can already sync the Android calendar with Outlook, CalenGoo can access and modify this calendar. Some vendors deliver PC software for this purpose with their phones (like Samsung KIES (Overview and download, Documentation) or HTC Sync (Overview and download)) to sync the Android calendar with Outlook via USB. Or you can use an independent solution like MyPhoneExplorer. So if you can sync the Android calendar with Outlook somehow, you can use CalenGoo with that calendar, too.
Syncing Outlook with Google Calendar
Or you can sync Outlook with Google Calendar by using e.g. a commercial solution like GSyncIt (with support) or a free solution like Outlook CalDav Synchronizer (but probably without support and more difficult to set up). Then CalenGoo can simply sync with Google Calendar and this way sync with your Outlook calendar, too.
GSyncIt also supports syncing different Outlook categories into different Google calendars or to use different Google colors for different Outlook categories. To use different Google colors it might be necessary to rename the Outlook categories.
GSyncIt also supports syncing different Outlook categories into different Google calendars or to use different Google colors for different Outlook categories. To use different Google colors it might be necessary to rename the Outlook categories.
Outlook tasks
CalenGoo can sync tasks with Microsoft Exchange servers. Just enter your Exchange account under "Settings > Tasks > Add account > Microsoft Exchange" in CalenGoo.Syncing with Outlook.com or Office 365
CalenGoo can be synced with Outlook.com/Office 365 via the Android calendar or directly. To sync it directly, just enter your account under "Settings > Accounts > Add account > Exchange" in CalenGoo or use "Settings > Accounts > Add account > Office 365" for an Office 365 account (also MFA / 2FA is supported because CalenGoo uses Microsoft’s OAuth2 login). To sync via the Android calendar ensure that "Settings > Accounts > Android" is checked in CalenGoo and then sync the Android calendar with Outlook.com as explained under "Android" here:http://windows.microsoft.com/en-us/windows/outlook/to-go
There it says:
- On your device, tap Email, then tap Add account.
- Enter your Outlook.com/Office 365 email address and password, then tap Manual setup.
- Under What type of account is this? tap Exchange.
- If there is a Domain field, leave it blank. If there is a Username field, enter your email address.
- Enter your password.
- For Server name enter s.outlook.com for an Outlook.com account or outlook.office365.com for an Office 365 account.
- Make sure the Use secure connection (SSL) checkbox is checked, then tap Next.
- Choose your account options and tap Next.
- To finish setup, tap Done.